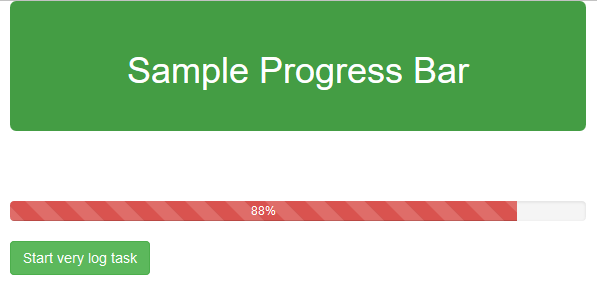
 We may have a request to the back end system which may trigger a long running process such as searching huge amount of data or a long running database process. Then the front end webpage may hang and wait for the process to be finished. During this process, if we can provide the user some information about the progress of the back end process, it may improve user experience. Unfortunately, in web applications, this seems not an easy task because web scripting languages don’t support multithreading and HTTP is stateless. We now can have AJAX to simulate real time process. Today we will use PHP+jQuery to simulate a process to get the progress of a long running process dynamically.
Create progress.php
<?php
// recommended to prevent caching of event data.
header('Cache-Control: no-cache');
session_start();
$_SESSION['progress_status'] = 0;
?>
<!DOCTYPE html>
<html>
<head>
<title>TODO supply a title</title>
<meta charset="UTF-8">
<meta name="viewport" content="width=device-width, initial-scale=1.0">
http://js/jquery.js
<!-- Latest compiled and minified CSS -->
<link href="css/bootstrap.min.css" rel="stylesheet" type="text/css"/>
$(document).ready(function () {
function getProgress() {
var random = Math.random(1000);
$.post('progress_status.php', {random: random}, function (status) {
var progressBar = $(".progress-bar");
progressBar.attr('aria-valuenow', status);
progressBar.css('width', status + '%');
progressBar.html(status + '%');
if (status
</head>
<body>
Sample Progress Bar
</div>
Start very log task
</div>
</body>
</html
Create progress_start.php
<?php
// recommended to prevent caching of event data.
header('Cache-Control: no-cache');
$_SESSION['progress_status'] = 0;
for ($i = 1; $i <= 100; $i++) {
session_start();
$_SESSION['progress_status'] = $i;
session_write_close();
sleep(1);
}
?>
Create progress_status.php
<?php
// recommended to prevent caching of event data.
header('Cache-Control: no-cache');
session_start();
echo $_SESSION['progress_status'];
?>
Import/Export excel report file in php with PHPExcel

PHPExcel – OpenXML – Read, Write and Create Excel documents in PHP – Spreadsheet engine
Project providing a set of classes for the PHP programming language, which allow you to write to and read from different spreadsheet file formats, like Excel (BIFF) .xls, Excel 2007 (OfficeOpenXML) .xlsx, CSV, Libre/OpenOffice Calc .ods, Gnumeric, PDF, HTML, … This project is built around Microsoft’s OpenXML standard and PHP.
Checkout the Features this class set provides, such as setting spreadsheet meta data (author, title, description, …), multiple worksheets, different fonts and font styles, cell borders, fills, gradients, adding images to your spreadsheet, calculating formulas, converting between file types and much, much more!
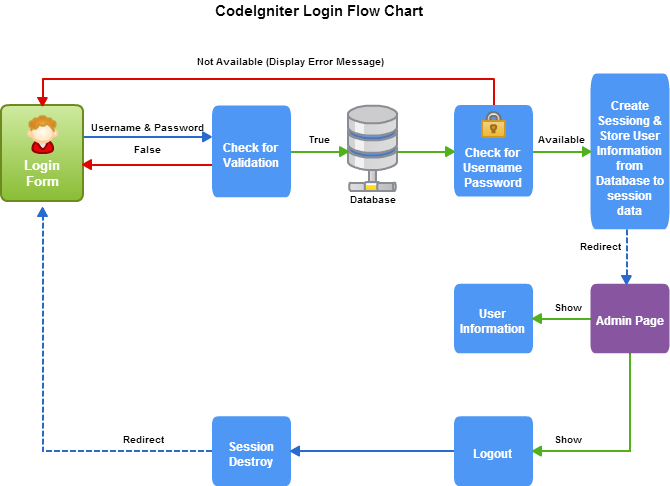
CodeIgniter Simple Login Form With Sessions

In this tutorial, we are going to learn about creating a simple login form in CodeIgniter. In login form, we made registration module, login module and admin panel using sessions.
We also have a paid ready-to-use advance login & registration module built on CodeIgniter that you can check out at CodeIgniter Login Registration Form.
Creating sessions in CodeIgniter is different from simple PHP. I will give you detailed information about all the method as we move further in this tutorial.
Note : You can also refer the PHPProjectInstall.pdf file given in the download code folder.
Before starting, let’s have a look on what we are going to learn about.
- Create login page, signup page and admin page.
- Setting up validation to all input field.
- Check for existing users in database during signup process.
- Check for username and password in database and show their information stored in database.
- Create session for admin panel, store users input data in session and destroy session(logout).
For Complete Post click here
30+ PHP Best Practices for Beginners
PHP is the most widely-used language for programming on the web. Here are thirty best practices for beginners wanting to gain a firmer grasp of the fundamentals.
Editor’s Note: The “Best Practices” series has been my baby for three articles now. However, due to my focus on the CI video series, I’ve decided to hand off this next entry to Glen. Having said that, I’m not very good at keeping my mouth shut! I thought it might be fun to sporadically add a few rebuttals to his tips. I hope he doesn’t mind!
1. Befriend the PHP Manual
If you’re new to PHP, then it’s time to get acquainted with the awesomeness that is the PHP manual. The PHP manual is incredibly thorough and has truly helpful comments following each article. Before asking questions or trying to figure out an issue on your own, save some time and just head straight to the manual. Odds are the answer to your question is already nestled in a helpful article at the PHP.net site.
2. Turn on Error Reporting
Error reporting in PHP is very helpful. You’ll find bugs in your code that you might not have spotted earlier, as not all bugs keep the application from working. There are different levels of strictness in the reporting that you can use, but E_ALL will show you the most errors, critical and warnings alike.
Once you’ve gotten your application ready for production, you’ll want to turn off error reporting, or your visitors will see strange errors that they don’t understand.
3. Try an IDE
IDE’s (Integrated Development Environments) are helpful tools for any developer. While they’re not for everyone, an IDE definitely has its place. IDE’s provide tools like
syntax highlighting
code completion
error warnings
refactoring (reworking)
And many other features. There are plenty of great IDEs out there that support PHP.
Try an IDE
4. Try a PHP Framework
15 Best PHP Libraries Every Developer Should Know
 PHP is a powerful Web site scripting language that makes it easier for Web site developers to create dynamic and engaging Web pages. Developers can use PHP code with a number of Web site templates and frameworks for improved functionality and features. However, writing PHP code can be a tedious and time-consuming process. In order to reduce development time, developers can use PHP libraries instead of writing code to add features to the site.
Using PHP libraries instead of writing the code can considerably reduce Web site development time, thereby allowing developers to focus on other important aspects of the Web site design.
Here we have compiled a list of the 15 best PHP libraries that will help Web site developers increase the functionality of their sites easily and optimize PHP development time.
1. PChart
PChart is an impressive PHP library that helps generate text data in the form of a visual chart. The data can be displayed in the form of bar charts, pie charts, and other formats. The PHP script generates charts and graphs using SQL queries that help in creating amazing charts and graphs.
2. PHP CAPTCHA
PHP CAPTCHA is another great PHP library that creates Continue Reading »
20+ .htaccess Hacks Every Web Developer Should Know About
1. Prevent Hotlinking
Tired of people using your bandwidth by putting the images hosted on your server on their website? Add the following code at the bottom of your .htaccess file to prevent hotlinking.
1Options +FollowSymlinks
2#Protect against hotlinking
3RewriteEngine On
4RewriteCond %{HTTP_REFERER} !^$
5RewriteCond %{HTTP_REFERER} !^http://(www.)?domainname.com/ [nc]
6RewriteRule .*.(gif|jpg|png)$http://domainname.com/img/stop_stealing_bandwidth.gif[nc]
NOTE: The following article explains better methods to “prevent” hotlinking:
Link building secrets by Maurizio Petrone
2. Block All Requests From User Agents
It’s possible to block all unwanted user agents that might be potentially harmful or perhaps just to keep the server load as low as possible.
01#Block bad bots
02SetEnvIfNoCase user-Agent ^FrontPage [NC,OR]
03SetEnvIfNoCase user-Agent ^Java.* [NC,OR]
04SetEnvIfNoCase user-Agent ^Microsoft.URL [NC,OR]
05SetEnvIfNoCase user-Agent ^MSFrontPage [NC,OR]
06SetEnvIfNoCase user-Agent ^Offline.Explorer [NC,OR]
07SetEnvIfNoCase user-Agent ^[Ww]eb[Bb]andit [NC,OR]
08SetEnvIfNoCase user-Agent ^Zeus [NC]
09<limit get="" post="" head="">
10Order Allow,Deny
11Allow from all
12Deny from env=bad_bot
13</limit>
3. Redirect Everyone Except Specified IPs
If for some reason you would want to deny everyone or allow only a Continue Reading »
Major Shipping Rate Changes Announced: What eCommerce Companies Need to Know

Monday, May 12th, 2014
Size matters. That’s what FedEx and UPS are telling us with recent rate calculation changes announced this year. Effective January 2015, all ground packages will be subject to “Dimensional Weight” pricing, rather than just actual weight, to determine shipping rates. Until now, this pricing was reserved for large ground shipment boxes (greater than three cubic feet) and express shipments. What this truly means for eCommerce companies is that box sizes for all shipments are going to become very important!
First of all, what is dimensional weight? It’s a theoretical weight for a package, based on the package size or dimensions (height, width, and length). It protects shipping carriers from losing money filling their trucks with large but light weight shipments.
In 2015, carriers will calculate both rates for shipments: the dimensional weight (formula shown below), and the actual weight. The rate charged (the billable weight) will be based on the higher value. For example, if a dimensional weight is ten pounds, but the actual weight is eight pounds, you will still be charged for a ten pound package. If the same box were filled with 12 pounds of goods, the actual weight would exceed the dimensional weight, and thus the actual weight of 12 pounds would be charged.
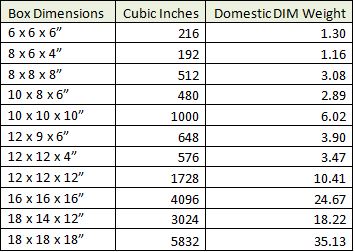
How to calculate dimensional weight (Dim Weight):
Domestic* Dim Weight Formula:
Length x Width x Height / 166
• Example Box A: 12”x12”x12” = 1728 cubic inches / 166 = 10.41 lbs dimensional weight
• Example Box B: 9”x9”x9” = 729 cubic inches/166 = 4.39 lbs dimensional weight
• *International dim weight formula is Length x Width x Height / 139
What this means for you:
• Always enter your box sizes in your eCommerce system. Without this box information, your system would be unable to pull in accurate real time rates when these new changes go into effect. If you are a Nexternal client, you may do this in Settings / Compatible Software / Online Shipping Tools / Preferences / General Options (or ask your Account Manager for assistance).
• Notify and train your shipping staff. Not everyone needs to understand dimensional weight, but you should let them know that package weight is no longer the key determining factor for ground shipment rate. Tell them how important box sizes are going to be in 2015. Also, make sure they know that changing box sizes will likely change rates (many people don’t know this).
• Pack as much as you can safely fit into each box. Every inch counts! Ensure that your packing materials are plentiful enough to protect your items from damage, but as compact as possible to fit into the smallest possible box.
For your reference:
Dimensional weight for some popular box sizes

Source : NEXTERNAL
PHP Redirect 301 permanently
Sometimes you might want to redirect your visitors to a new URL address. This article will show you how to make a PHP redirect using the 301 “moved permanently” redirection. This is the one you should use as it is the most search engine friendly. Like the name suggests, PHP redirect tells the browser (or a search engine bot) that the page has been permanently moved to a new location.
PHP Redirect Code
To redirect people and robots to a new location use this PHP redirecting code:
<?php
header(“HTTP/1.1 301 Moved Permanently”);
header(“Location: http://www.New-Website.com”);
?>
Tip: use lower-case name for the header function (not Header) to make sure your PHP redirect code is compatible with PHP 6.
You could skip the 301 Moved Permanently tag and use just:
<?php
header(“Location: http://www.New-Website.com”);
?>
But this would result in a “302 Moved Temporarily” redirect instead of a 301 one. This should be avoided as permanent redirects are more search engine friendly and should be used where possible.
You can enter any sub-page for the location, this PHP code will redirect users to the test.php sub-page of your website:
<?php
header(“HTTP/1.1 301 Moved Permanently”);
header(“Location: http://www.New-Website.com/test.php”);
?>
It is important that you don’t have any other code (including empty rows and spaces) before the above PHP redirect code. If you do you will get a nice headers already sent notice from PHP and the redirect will not work.
That’s it! Enjoy redirecting PHP pages.
Credits to phpjunkyard.com
How to make Select All with single check box in jQuery?
How to make Select All with single check box in jQuery.
$(document).ready(function () {
$('#selecctall').click(function (event) { //on click
if (this.checked) { // check select status
$('.check').each(function () { //loop through each checkbox
this.checked = true; //select all checkboxes with class "checkbox1"
});
} else {
$('.check').each(function () { //loop through each checkbox
this.checked = false; //deselect all checkboxes with class "checkbox1" });
}
});
});

